Active Directory hosts objects that together define the core elements of a Windows network. Computer and User objects are two examples of the many object types residing here.
Exchange was one of the first to embrace the extensibility opportunities AD provided. From Exchange 2000, AD absorbed the Exchange configuration objects and user mailbox information. The directory brought together the information for Windows users and Exchange mailboxes. Since then, AD continued to play this important role in all subsequent releases including the latest Exchange 2007.
Today we look at some tools allowing us to extract information from Active Directory. Microsoft provides a good number of these. The ones we will discuss, LDIFde.exe and CSVde.exe, are installed with Windows 200x Server.
Our discussion will mainly focus on the export of user objects. However the same could be applied to any other AD object.
ldifde -f c:\temp\user1.txt -d cn=user1,cn=users,dc=vertical,dc=local -v
In this case I am extracting a user named "user1" and saving it to an external file. Looking at the exported data we see how a user object, like any other AD object, boils down to a bunch of properties. Here is how the exported data looks like:
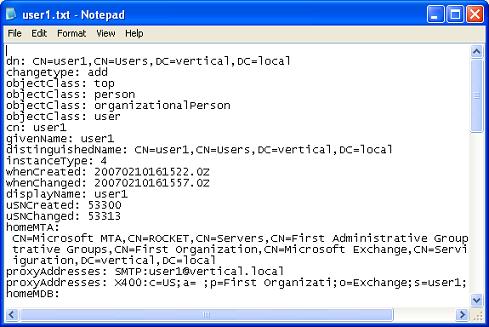
The following are some user object properties of interest to Exchange administrators.
dn: CN=user1,CN=Users,DC=vertical,DC=local
The Distinguished Name DN identifies exactly where the object is located within the directory. This is similar to a reversed directory path. The path starts from the object name, and traverses the directory upwards to the root.
cn: user1
The Common Name CN is the object name, the first part in the object DN.
proxyAddresses: SMTP:user1@vertical.local
proxyAddresses: X400:c=US;a= ;p=First Organizati;o=Exchange;s=user1;
proxyAddresses are the set of user addresses. These are generated and maintained by the Exchange Recipient Update Service RUS. Typically here we find SMTP and X400 addresses. However other address types may also be present, such as those used in FAX server gateways.
mailNickname: user1
The mailNickname is the SMTP email alias. In Exchange this is often used to identify objects that are to appear in an Address book.
legacyExchangeDN:
/o=First Organization/ou=First Administrative Group/cn=Recipients/cn=user1
The legacyExchangeDN is another type of distinguished name. This used to be the DN format in Exchange 5.5 and earlier versions. Today we still encounter these especially when dealing with MAPI applications such as ExMerge.
ldifde -f c:\temp\user1.txt -d cn=user1,cn=users,dc=vertical,dc=local -v
csvde -f c:\temp\user1.txt -d cn=user1,cn=users,dc=vertical,dc=local -v
Don't waste too much energy looking for differences. It's the same set of parameters. This is great since learning how to use one application takes us a long way in using the other.
The main difference between the two is the file format used for importing/exporting data. LDIFde.exe uses the Lightweight Data Interchange Format. CSVde.exe uses the more familiar Comma Separated Value format.
When it comes to advanced directory operations, LDIFde.exe is the most appropriate. However here we won't really need this extra power. On the other hand CSVde.exe gives us a file format that can be easily opened in MS Excel or MS Access. This is very handy when going through a large number of objects.
Going through all the parameters is beyond the scope. Instead we will discuss the most important ones. Both applications run in export mode by default. As a minimum we typically need to add the -f and -d parameters. -f identifies the file where the exported data is to be saved. -d identifies the DN of the directory location from where the export is to start. This can be the DN of a specific object as we did in case of user1 above, or it could be the DN for a container holding other objects and containers.
Getting used to constructing DNs is our first step. Unfortunately the seemingly cryptic format tends to discourage some. However, when dealing with user objects this is quite easy. Just open the AD Users and Computers MMC console from which we can deduce the DN for any container/object:
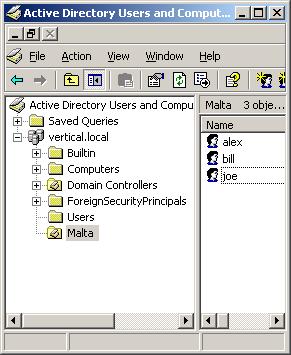
In general we need to remember that when converting the domain FQDN (vertical.local) to an AD DN we need to use the 'DC=' (DC=vertical,DC=local). When dealing with organizational units we use 'OU=' and when dealing with other containers and objects we use 'CN='. Building the final DN starts from the container/object of interest and moves upwards towards the root. So the DN for the user Alex under the Malta organizational unit is just a matter of bringing together all the parts:
CN=alex,OU=Malta,DC=vertical,DC=local
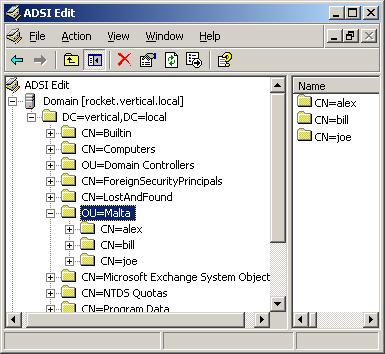
Alternatively we could use another tool from Microsoft, ADSIEdit. Get the Windows 200x Server CD and install the support tools. Next browse to the 'Support Tools' directory under Program Files and run ADSIEdit.msc. See how the ADSIEdit tree view shows the exact name composing the DN.
We already learned enough to start exporting AD objects. Just remember to enclose any DNs containing whitespace in double quotes. The following shows how we can export all three users under the Malta OU:
ldifde -f c:\temp\Malta.txt -d ou=malta,dc=vertical,dc=local -v
csvde -f c:\temp\Malta.txt -d ou=malta,dc=vertical,dc=local -v
This will export all domain controller objects:
ldifde -f c:\temp\DCs.txt -d "ou=domain controllers,dc=vertical,dc=local" -v
csvde -f c:\temp\DCs.txt -d "ou=domain controllers,dc=vertical,dc=local" -v
Exchange was one of the first to embrace the extensibility opportunities AD provided. From Exchange 2000, AD absorbed the Exchange configuration objects and user mailbox information. The directory brought together the information for Windows users and Exchange mailboxes. Since then, AD continued to play this important role in all subsequent releases including the latest Exchange 2007.
Today we look at some tools allowing us to extract information from Active Directory. Microsoft provides a good number of these. The ones we will discuss, LDIFde.exe and CSVde.exe, are installed with Windows 200x Server.
Our discussion will mainly focus on the export of user objects. However the same could be applied to any other AD object.
What is a User?
In Active Directory terminology a user is an object of class "user". To an Exchange administrator this definition may need to be broadened to include all objects that are listed at the address book. However to begin with let's have a look at how a user looks like when exported using the LDIFde.exe command:ldifde -f c:\temp\user1.txt -d cn=user1,cn=users,dc=vertical,dc=local -v
In this case I am extracting a user named "user1" and saving it to an external file. Looking at the exported data we see how a user object, like any other AD object, boils down to a bunch of properties. Here is how the exported data looks like:
dn: CN=user1,CN=Users,DC=vertical,DC=local
The Distinguished Name DN identifies exactly where the object is located within the directory. This is similar to a reversed directory path. The path starts from the object name, and traverses the directory upwards to the root.
cn: user1
The Common Name CN is the object name, the first part in the object DN.
proxyAddresses: SMTP:user1@vertical.local
proxyAddresses: X400:c=US;a= ;p=First Organizati;o=Exchange;s=user1;
proxyAddresses are the set of user addresses. These are generated and maintained by the Exchange Recipient Update Service RUS. Typically here we find SMTP and X400 addresses. However other address types may also be present, such as those used in FAX server gateways.
mailNickname: user1
The mailNickname is the SMTP email alias. In Exchange this is often used to identify objects that are to appear in an Address book.
legacyExchangeDN:
/o=First Organization/ou=First Administrative Group/cn=Recipients/cn=user1
The legacyExchangeDN is another type of distinguished name. This used to be the DN format in Exchange 5.5 and earlier versions. Today we still encounter these especially when dealing with MAPI applications such as ExMerge.
Using LDIFde.exe and CSVde.exe
LDIFde and CSVde are two very similar command-line applications. Both allow us to import and export information to/from Active Directory. Furthermore the two applications support almost the same set of input parameters. As an example here is how to export a user with each of these tools:ldifde -f c:\temp\user1.txt -d cn=user1,cn=users,dc=vertical,dc=local -v
csvde -f c:\temp\user1.txt -d cn=user1,cn=users,dc=vertical,dc=local -v
Don't waste too much energy looking for differences. It's the same set of parameters. This is great since learning how to use one application takes us a long way in using the other.
The main difference between the two is the file format used for importing/exporting data. LDIFde.exe uses the Lightweight Data Interchange Format. CSVde.exe uses the more familiar Comma Separated Value format.
When it comes to advanced directory operations, LDIFde.exe is the most appropriate. However here we won't really need this extra power. On the other hand CSVde.exe gives us a file format that can be easily opened in MS Excel or MS Access. This is very handy when going through a large number of objects.
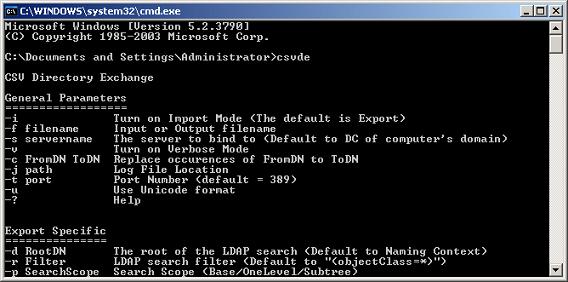
Command Line Parameters
To get to the application help screen run the command without any parameters. Here is how the CSVde.exe help looks like (the one for LDIFde.exe is very similar).Getting used to constructing DNs is our first step. Unfortunately the seemingly cryptic format tends to discourage some. However, when dealing with user objects this is quite easy. Just open the AD Users and Computers MMC console from which we can deduce the DN for any container/object:
CN=alex,OU=Malta,DC=vertical,DC=local
Alternatively we could use another tool from Microsoft, ADSIEdit. Get the Windows 200x Server CD and install the support tools. Next browse to the 'Support Tools' directory under Program Files and run ADSIEdit.msc. See how the ADSIEdit tree view shows the exact name composing the DN.
ldifde -f c:\temp\Malta.txt -d ou=malta,dc=vertical,dc=local -v
csvde -f c:\temp\Malta.txt -d ou=malta,dc=vertical,dc=local -v
This will export all domain controller objects:
ldifde -f c:\temp\DCs.txt -d "ou=domain controllers,dc=vertical,dc=local" -v
csvde -f c:\temp\DCs.txt -d "ou=domain controllers,dc=vertical,dc=local" -v
Final Tips
Today we saw how AD objects look like. The ability to construct DNs gave us the key to perform our first directory exports. However using these basic export commands can return an overwhelming number of objects. In the second part of this article, we will perform more selective exports with the help of filters. Finally MS Excel and MS Access will help us review the exported results.ExchangeInbox.com - Replacing the Exchange 2007 Self-Signed Certificate (Part 2)
Installing a new Certificate involves, creating a Certificate request on Exchange 2007, submitting the request to a Certification Authority and installing the returned Certificate on Exchange. Here is how we went about completing these steps.
In Replacing the Exchange 2007 Self-Signed Certificate (Part 1) we looked at the choice between public and private Certification Authorities CAs. For the latter, we walked through the installation of Certificates Services on Windows 2008. We also discussed the Certificate Subject, Subject Alternative Names SAN and wildcards. In this discussion we identified the need for a Certificate covering the names:
owa.exchangeinbox.com
autodiscover.exchangeinbox.com
exchsrv
exchsrv.exchinbox.local
Today we complete the discussion walking through the steps necessary for creating and installing a new Certificate.
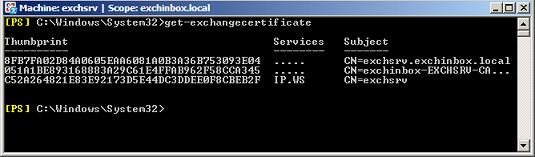
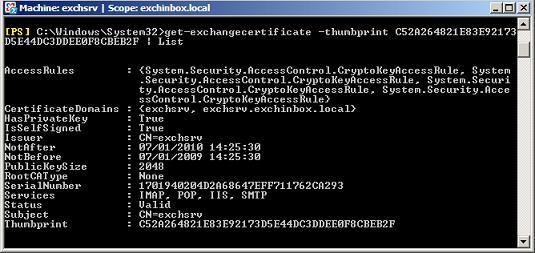
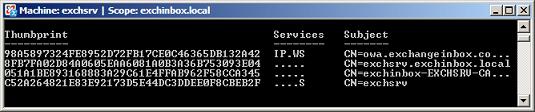
Normally we would only get the last Certificate, here having a thumbprint starting with C52A. The other two Certificates were created on installing the Certification Authority and are not in use by any Exchange services. We take a closer look at this Certificate identifying it using the thumbprint.
Note: This article uses Certificate thumbprints a number of times. In your case you have to replace these with the thumbprints taken from your own Exchange installation.
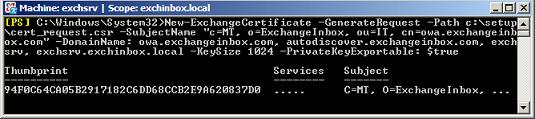
Generating a request involves running the New-ExchangeCertificate cmdlet. This is the part requiring most planning. Here we have to get the names right as discussed in the first part of the article. In my case I used the following cmdlet:
New-ExchangeCertificate
-GenerateRequest
-Path c:\setup\cert_request.csr
-SubjectName "c=MT, o=ExchangeInbox, ou=IT, cn=owa.exchangeinbox.com"
-DomainName: owa.exchangeinbox.com, autodiscover.exchangeinbox.com, exchsrv, exchsrv.exchinbox.local
-KeySize 1024
-PrivateKeyExportable: $true
New-ExchangeCertificate is fed with the GenerateRequest parameter showing that here we are not truly creating a new Certificate but just a request. The resulting request will be saved to disk at the specified path base64 encoded. The SubjectName and DomainName are the parameters identifying the Certificate Subject and Subject Alternative Name extension respectively.
The SubjectName is an X.500 Distinguished Name DN identifying the Certificate user (owa.exchangeinbox.com). A public CA will check this value carefully before issuing a Certificate. It is their job to make sure you are who you claim to be. If using a private CA, you would still want to choose a DN that is representative of your organization and the entity using the Certificate.
At the DomainName we just list all names discussed earlier. If using wildcards we could have instead used:
-DomainName: *.exchangeinbox.com, exchsrv, exchsrv.exchinbox.local
Running New-ExchangeCertificate successfully creates a new entry in the Exchange Certificate list. Of course we also get the request itself saved at the specified path.
We now hand the request to the Certification Authority. If using a public CA we submit this through their web interface. A private CA using Certificates Services provides a number of options. The Certificates Services web enrolment interface requires us to paste the content of the request file. In this case we would paste everything including the Begin/End header areas.
For a walk through the procedure for submitting the request to Certificates Services, check the section that follows. For the moment let's just assume we got the Certificate back ready to be installed.
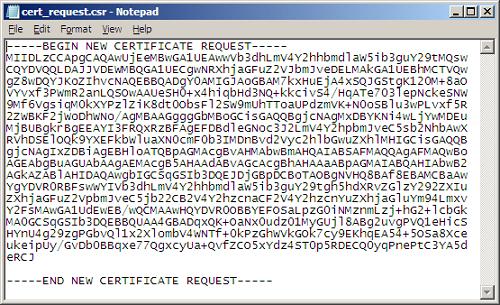
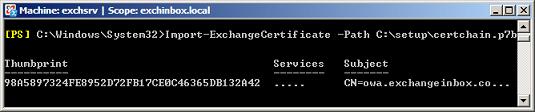
We should now have one or more files covering the Certificate chain. At this point it is most convenient to work with the PKCS #7 Certificate file having an extension of *.p7b that bundles the Certificate chain in one file. With this we go back to the Exchange shell and run the cmdlet that follows. Here certchain.p7b is the file returned by our CA:
Import-ExchangeCertificate -Path C:\setup\certchain.p7b
Exchange will now install the new Certificate. In the Certificates list returned by Get-ExchangeCertificate, this will replace the entry that was created on running New-ExchangeCertificate to generate the request.
Next using the cmdlet that follows, we assign the new Certificate all the services for this Exchange server:
Enable-ExchangeCertificate
-Thumbprint 98A5897324FE8952D72FB17CE0C46365DB132A42
-services IIS, POP, IMAP, SMTP
Calling Get-ExchangeCertificate we see how the new Certificate has taken over these services.
We may finally delete the old self-signed Certificate using the command:
Remove-ExchangeCertificate
-Thumbprint C52A264821E83E92173D5E44DC3DDEE0F8CBEB2F

Selecting the 'Submit new request' task prompts you to select the Certificate request file. However on doing so we get back the error:
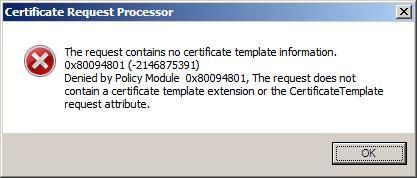
To avoid this problem we could use the Web Enrolment service or the certreq.exe command line application. I did the latter, using the command line that follows. Note how the attrib parameter specifies a template that was the root cause of the previous error.
certreq.exe -submit -attrib "CertificateTemplate:WebServer" c:\setup\cert_request.csr

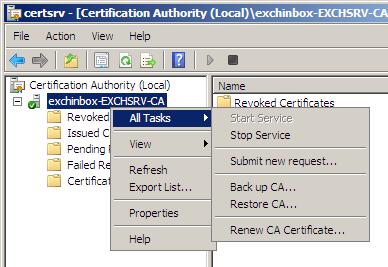
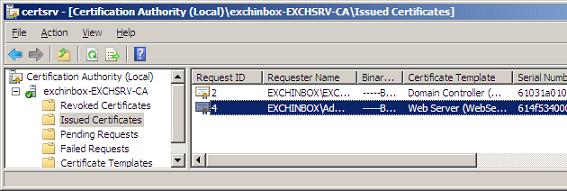
This will prompt us to select the CA to which the request is to be submitted and finally creates the Certificate for us. We can now retrieve the newly created Certificate from the Certification Authority MMC.
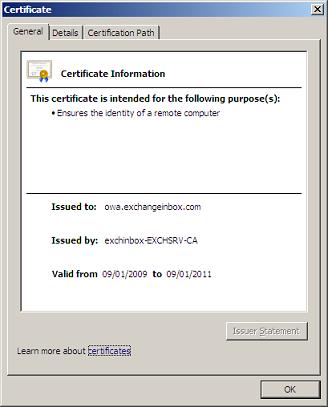
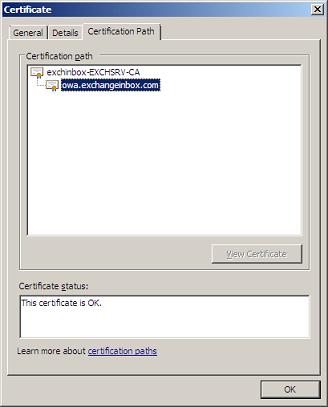
Opening the Certificate we can look at its properties. The General page shows how the owa.exchangeinbox.com Certificate was issued by our newly created private CA. The Certification Path page shows the hierarchical relationship between the Certificate and the CA. This chain could in practice be composed of additional sub-authorities that form part of this chain.
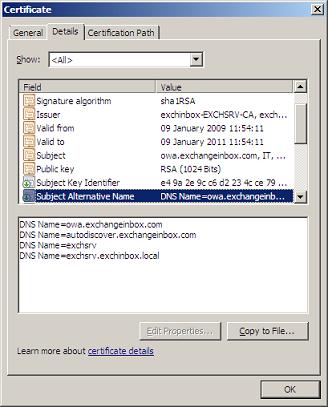
The Details page shows us the various Certificate fields. Have a look at the Subject and Subject Alternative Names. See how all four DNS names are listed.
The Details page also provides the 'Copy to File' button that launches the Certificate Export Wizard. Click this and proceed to the Export File Format Page.
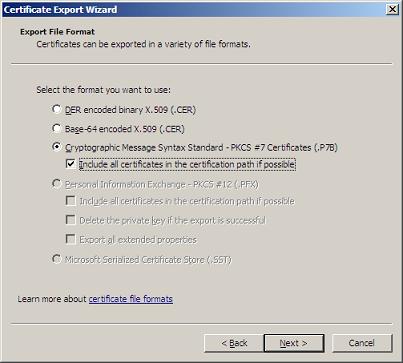
Here we select the PKCS #7 Certificate and also set the checkbox for including all Certificates in the certification path. Following that, proceed to the file path selection step. Specify where the p7b file is to be saved and complete the wizard.
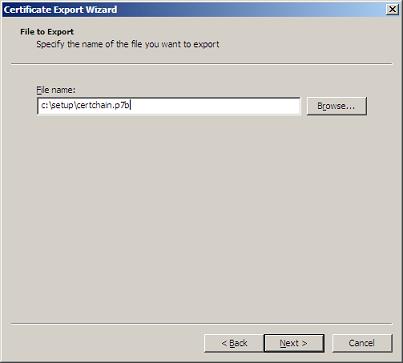
We should now have our p7b file ready for importing into Exchange 2007 as discussed in the previous section.
Certificate Use in Exchange Server 2007
owa.exchangeinbox.com
autodiscover.exchangeinbox.com
exchsrv
exchsrv.exchinbox.local
Today we complete the discussion walking through the steps necessary for creating and installing a new Certificate.
Replacing Certificate on Exchange 2007
Installing a new Certificate in general involves these three steps:- On Exchange 2007 create a Certificate generation request.
- Submit the request to the public/private Certification Authority.
- Install the returned Certificate on Exchange 2007.
Note: This article uses Certificate thumbprints a number of times. In your case you have to replace these with the thumbprints taken from your own Exchange installation.
New-ExchangeCertificate
-GenerateRequest
-Path c:\setup\cert_request.csr
-SubjectName "c=MT, o=ExchangeInbox, ou=IT, cn=owa.exchangeinbox.com"
-DomainName: owa.exchangeinbox.com, autodiscover.exchangeinbox.com, exchsrv, exchsrv.exchinbox.local
-KeySize 1024
-PrivateKeyExportable: $true
New-ExchangeCertificate is fed with the GenerateRequest parameter showing that here we are not truly creating a new Certificate but just a request. The resulting request will be saved to disk at the specified path base64 encoded. The SubjectName and DomainName are the parameters identifying the Certificate Subject and Subject Alternative Name extension respectively.
The SubjectName is an X.500 Distinguished Name DN identifying the Certificate user (owa.exchangeinbox.com). A public CA will check this value carefully before issuing a Certificate. It is their job to make sure you are who you claim to be. If using a private CA, you would still want to choose a DN that is representative of your organization and the entity using the Certificate.
At the DomainName we just list all names discussed earlier. If using wildcards we could have instead used:
-DomainName: *.exchangeinbox.com, exchsrv, exchsrv.exchinbox.local
For a walk through the procedure for submitting the request to Certificates Services, check the section that follows. For the moment let's just assume we got the Certificate back ready to be installed.
We should now have one or more files covering the Certificate chain. At this point it is most convenient to work with the PKCS #7 Certificate file having an extension of *.p7b that bundles the Certificate chain in one file. With this we go back to the Exchange shell and run the cmdlet that follows. Here certchain.p7b is the file returned by our CA:
Import-ExchangeCertificate -Path C:\setup\certchain.p7b
Next using the cmdlet that follows, we assign the new Certificate all the services for this Exchange server:
Enable-ExchangeCertificate
-Thumbprint 98A5897324FE8952D72FB17CE0C46365DB132A42
-services IIS, POP, IMAP, SMTP
Calling Get-ExchangeCertificate we see how the new Certificate has taken over these services.
Remove-ExchangeCertificate
-Thumbprint C52A264821E83E92173D5E44DC3DDEE0F8CBEB2F
Submitting Request to Certificates Service
To begin, I first tried to submit the request through the Certificates Services CA MMC interface to expose a well known issue.'The request contains no Certificate template information. 0x80094801 (-2146875391) Denied by Policy Module 0x80094801, the request does not contain a Certificate template extension or the Certificate Template request attribute.'certreq.exe -submit -attrib "CertificateTemplate:WebServer" c:\setup\cert_request.csr
Final Tips
This concludes our walk through the installation of a new Certificate. Today we saw how using the Exchange 2007 shell we generated a Certificate request, imported the new Certificate and transferred the services from the self-signed Certificate. We also looked at how a Certificate request may be submitted to the Certificates Services CA that was installed in the first part of this article.References
Internet X.509 Public Key Infrastructure Certificate and Certificate Revocation List (CRL) ProfileCertificate Use in Exchange Server 2007
No comments:
Post a Comment